Hello and thanks for choosing KnoppMyth.
This document will describe what KnoppMyth
is and how to install it! Please read the entire document before
doing an install even if you've installed before. Some changes
have been made.
Q. & A.
What is KnoppMyth?
- Short Answer: KnoppMyth is Knoppix
optimized for MythTV.
- Long Answer: Our vision is a distribution that makes it
trivial to setup a set-top box.
We've included everything that believe is needing to reach this
goal.
And, in fact, the developers use this distribution on their own PVR's.
What is Knoppix?
What is MythTV?
Cool! So does this run completely from the CD?
- No. You can use the CD as a frontend, but KnoppMyth must be installed to the hard drive.
Will it ever run completely from the CD?
So what else is included?
Why isn't program X included?
- I only installed what I thought was needed. This doesn't
mean you cannot install it yourself:
# apt-get
update
# apt-get
install <packageX>
Why should I use KnoppMyth
instead of dristribution X?
- Ease of installation. KnoppMyth
can be installed in as little as 10 minutes (depending upon your
hardware speed) then all you have to wait for is the first week of TV
scheduling to be downloaded.
If all your hardware is supported under Linux, you may not have to edit
any configuration files.
Can I hook my boxen up to a television?
- Yes, that is how I watch TV. ;-)
So this is Debian?
- Knoppix is based on Debian
testing and unstable. It functions in the same manner, the only thing
that isn't recommended is
# apt-get
dist-upgrade
Installation
- In your BIOS, set the system to boot from CD.
- At the splashscreen press:
- for no TV out:
<ENTER>
- with TV out:
tv <ENTER>
This will set your video adapter to a resolution of 800x600.
Note: You'll still need to edit
/etc/X11/XF86Config-4 to change the refresh rate or you CAN destroy
your TV.
- Once the CD boots, you see 6 options.
- Frontend
- Auto Install
- Auto Upgrade
- Manual Install
- Reboot
- Quit
I'll now go into detail describing what the first four of these do (I won't bother with the last 2).
Frontend
This allows you to use the CD as a frontend if you have a MythTV
backend setup.
You can select this option by pressing <ENTER>.
After providing the requested information, the CD will boot X and start
mythfronted.
Note: Using the CD as a frontend is dependant upon the
backend being configured with MySQL listening on the network.
If you are running KnoppMyth as your
backend server, Then on the backend:
- Edit /etc/mysql/my.cnf, comment out 'skip-networking'.
The backend will only accept the mythtv user with a password of mythtv.
Before:
skip-networking
After
#
skip-networking
- Restart MySQL(as root)
#
/etc/init.d/mysql restart
- Reconfigure MythTV (as the mythtv user)
$ mythtv-setup
On screen 1 change 127.0.0.1(both instances) to the actual IP of the
backend server.
<ESC> out of the
myth-setup.
End of backend section.
Auto Install
This will automatically perform a complete installation of KnoppMyth. Just provide the requested
information in the various dialogs and sit
back! After the system reboots it will start X and KnoppMyth
will open an Xterm and ask for the root password.
If you have Pentium class processor select i586, PentiumPro and
above(including the Athlon) select i686.
If you have an nVidia chipset based card that support XvMC
you can install a version compiled for XvMC. However DO NOT
install it until after configuration has
started and the frontend starts for the first time. Then exit the
frontend and pressing <CTRL><ALT><F1>.
Login in as root. install-i586-x will install the i586 package with
XvMC. If you have a 686 class processor substitue 5 with 6.
install-i586-lx will install the i586 package with native
LIRC and XvMC. If you have a 686 class processor substitue 5 with
6. install-nvidia will then install the nVidia drivers. **NOTE**
A sample XF86Config-4 for nVidia w/ tv out is in /etc/X11/
Auto Upgrade
This will automatically upgrade KnoppMyth
from an earlier version
(R3 or R4).
Just provide the requested information in the various dialogs and sit
back! After the system reboots it will start X and KnoppMyth
will open an Xterm and ask for the root password. However DO NOT
install it until after configuration has
started and the frontend starts for the first time. Then exit the
frontend and pressing <CTRL><ALT><F1>.
Login in as root. install-i586-x will install the i586 package with
XvMC. If you have a 686 class processor substitue 5 with 6.
install-i586-lx will install the i586 package with native
LIRC and XvMC. If you have a 686 class processor substitue 5 with
6. install-nvidia will then install the nVidia drivers. **NOTE**
A sample XF86Config-4 for nVidia w/ tv out is in /etc/X11/
Manual Install
Manual install is recommended only for advanced users.
- If you only see 2 options, select partition the drive.
If there are more selections, use option 3 to partition your hard
drive.
Create 4 partitions as described below. - Partition one will be
used for /. Make this no less than a 2 gig partition, this will leave
plenty of room for growth. Make this bootable.
- Partition two for swap. No more than 256 megs is
needed. Set the type to swap(82).
- Partition three for cache. 5 gigs should be
plenty, if you have a PVR x50 you may want to make this bigger.
- Partition four for myth. Make this the rest of the
drive. Write the partition table to disk and quit (you may need to
reboot).
- Load config
Use a configuration path of /KNOPPIX/knoppmyth
- Configure installation
Choose /dev/hda1 as the partition upon which to put KnoppMyth. Provide the requested information.
- Start installation
This will take some time as all the files are coppied to disk. Please
be patient.
- Reboot
Note:
During the making of partitions, you can choose any fstype you wish,
ext2 is recommended for the live buffer (hda3) and ext3 for the data
(hda4).
# mke2fs
-O sparse_super -m0 -i8000000 -L cache -M /cache /dev/hda3
This should yield some performance increase on /cache (used for the
ring buffer)
# mke2fs
-j -O sparse_super -m0 -i8000000 -L myth -M /myth /dev/hda4
(I highly recommend a journalling fs for /dev/hda4)
***NOTE***
Some people have reported that for various reasons they cannot install
to hda.
If you are one such person, configure the installation as described
above. Then:
- Save the configuration.
- Remove /KNOPPIX/knoppmyth and choose a name.
- Press <CTRL><ALT><F3>.
vi the file (using the
name you choose).
- Change hda to hdb or whatever drive you'll be
installing on, dont forget the drive map. Write and Quit.
- Press <CTRL><ALT><F1>
to get back to the main menu.
- Load the configuration.
- Start the installation. **Use this method at your own
risk**
After the system reboots it will start X and KnoppMyth
will open an Xterm and ask for the root password.
However DO NOT install it until after configuration has
started and the frontend starts for the first time. Then exit the
frontend and pressing <CTRL><ALT><F1>.
Login in as root. install-i586-x will install the i586 package with
XvMC. If you have a 686 class processor substitue 5 with 6.
install-i586-lx will install the i586 package with native
LIRC and XvMC. If you have a 686 class processor substitue 5 with
6. install-nvidia will then install the nVidia drivers. **
NOTE**
A sample XF86Config-4 for nVidia w/ tv out is in /etc/X11/
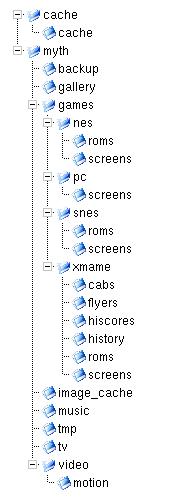
FS layout
KnoppMyth
uses the following filesystem layout:
| TEXT |
IMAGE |
/cache/cache (for the ring buffer)
/myth
	/backup  (used to backup the database, /home and /etc,
                         so upgrading between releases will be easy!)
	/gallery  (for your photos)
	/game     (for games)
		/nes   (for Nintendo emulation)
			/roms     (for roms)
			/screens  (for screenshots)
		/pc    (for "regular" computer games)
			/screens  (for screenshots)
		/snes  (for Super Nintendo emulation)
			/roms     (for roms)
			/screens  (for screenshots)
		/xmame (for xmame) the binary is in /usr/games/xmame
			/cabs         (for cabinet photos)
			/flyers       (for flyer photos)
			/hiscores   (for Hi-Scores!)
			/history      (for gameplay history)
			/roms         (for your roms)
			/screens      (for screenshots)
	/music
	/tv     (where recorded programs are kept)
	/video  (for various video formats)
		/motion (MPEGs created my Motion are stored here)
	/tmp    (temp space used by MythDVD)
|
 |
Added software packages
- IVTV: The open source drivers for Hauppauge PVR-250
and 350. I've included the first version of decoder-alpha.
I've tested this extensively with the PVR-250! While it should work
equally well with the 350, you may have better results with the newest
release.
See ivtv.sf.net for more as well as http://www.poptix.net/ivtv/Jul-2003/msg00366.html
for information on getting the TV out to work.
- LIRC: So you can use a remote! LIRC is compiled to
support Hauppauge tuners/remotes. The configuration file in
/etc/lircd.conf is for the Hauppauge gray remote. lircrc in
/home/mythtv/.mythtv/lircrc is for the Hauppauge gray remote. For more
information on LIRC, see lirc.org.
Source is in /usr/src/. If you have a remote other than the gray
Hauppauge remote, you need to recompile LIRC for that remote. In
addition you need an lircd.conf in /etc/ that is for that
remote(/usr/src/remotes.tar.bz2) you also need a lircrc in
/home/myhtv/.myhtv/ for that remote.
- Motion: Motion is used to detected and record motion.
It is configured to create these files in /myth/video/motion, so you
can use MythVideo to view the files. You can also view live captures at
http://<ip.of.knopp.myth>:8081/motion.html. Give a proper
firewall/router configuration you can monitor your home from anywhere!
The configuration file for motion is in
/home/mythtv/.motion/motion.conf. To use MythVideo to use the clips,
first go to For more information on Motion, please see motion.sf.net and take a look at the
Motion guide.
- MPlayer: Compiled on an Athlon XP, recompile for
different architecture or if you require additional features. Source is
in /home/mythtv/r4v2_src
- NFS as been configured to export /myth. It is
however not set to start on boot.
- Samba as been configured to export /myth. It is
however not set to start on boot.
Tips and Hints
- KnoppMyth runs a script
on each boot that checks for tuner cards. If changes are detected, KnoppMyth will update the modules
configuration. If your card needs special options, then more /etc/modutils/KnoppMyth. This will tell
you which file is used, make the changes to that file.
- If you have the system hooked up to a TV, then
**ENSURE** that /etc/X11/XF86Config-4 contains:
HorizSync "30 - 50"
VertRefresh "60"
- If you have your box hooked up to a TV and, when it
boots, you see a message saying Press
<RETURN> to see modes...... You'll need to edit your
lilo.conf At the top, it should say vga=<XXX>,
change it to vga=normal Don't forget to lilo -v when you are done ;)
- If you have problems or questions please visit the
forum. Before asking, we ask that you search the forum as you
issue may have been address already. You can also search the
MythTV archive
and the IvyTV archive.
Enjoy!
Cecil and Dale
|